Superhero Coding Game

Year Level:
F-2

Subject:
Technologies

Strand:
Digital Technologies

Sub-Strand:
Digital Technologies Processes and Production Skills

Content Descriptor:
Follow, describe and represent a sequence of steps and decisions (algorithms) needed to solve simple problems (ACTDIP004).

Link to the Resources:
http://littlebinsforlittlehands.com/superhero-computer-coding-game-without-a-computer/

Cross-Curriculum Priorities and General Capabilities:
Literacy, Numeracy, Information and Communication Technology (ICT) Capability and Critical and Creative Thinking

Links to Other Learning Areas:
Science, Mathematics and English

A Classroom Activity Using this Resource:
This is a simple coding game to introduce th basic concepts of coding without using a computer. Students will get the opportunity to create the board game with the objective being that the superhero has to avoid bad guys and get the jewels. Students will use sticky notes to create a sequence using basic coding commands that will determine the path the superhero has to take. This board game can be used in early childhood settings to introduce basic coding commands before introduced to coding on a computer. As students develop in confidence with the commands, the game can be modified to a more advanced level. This coding game is based around the STEM (science, technology, engineering and mathematics) initiative. STEM allows us to use current technologies that allow us to drive innovation in our fast-changing economy.

How to use this resource:
To make this game you will need:

  • A poster board/A3 piece of paper
  • Craft tape or ruler and marker
  • Post it notes (3 different coloured piles)
  • Superheroes
  • Obstacles
  • Jewels

Start by creating the board using either an A3 piece of paper or a poster board. Using either craft tape or a marker and rule create the lines for the grid. Once you have drawn the grid establish a starting and finishing point.

When creating the command cards we use three basic commands. Forward. Turn Left. Turn Right. On top of each pile of sticky notes
draw one of the commands.

Place the obstacles and jewels on the board to make it difficult for the superhero to reach the finish line.
Start the game! Ensure students have ample space to lay out the code in front of them. As students move the superhero they will layout the forward,turn left and turn right cards in front of them. They need to determine the shortest route to get to the finish line and collect all the jewels.

Advanced Version – students use the sticky notes to plan their commands before they go. Then move the superhero trough the series of commands to see if they were correct.

Straw Scaffold

Straw Scaffold     

identical.jpg

Subject: Design and Technology

Year level: 3/4

Strand: Knowledge and Understanding- Investigate how forces and the properties of materials affect the behaviour of a product or system.(ACTDEK011).

Strand: Processes and Production Skills- Generate, develop and communicate design ideas and decisions (ACTDEP015).

Children like to build, make and create. From building a tower or a city with lego or blocks, to building towers, this resource is sure to grab the attention of the students in the classroom. Straw scaffold provides the opportunity for the students to think carefully and creatively to produce a strong and stable scaffold, secure enough the hold a beaker of water. This challenging activity is sure to be a hit amongst the students, highlighting the design and technology aspects of their learning with a cross curriculum link to Mathematics.

Link of resource:https://nrich.maths.org/8847

Links to other learning area: Mathematics- STEM design and technology

How to do this as a classroom activity:

Students are presented with a scenario in which they must produce the most efficient way of making a scaffolding

The only materials provided to the students are drinking straws and some sticky tape.

The straw scaffold must be able to hold a beaker of water and must stand alone without support.

The best design will be the scaffold which holds the greatest volume of water with the least amount of straws used. Students will record this.

Natasa Jovanovic

eed6707dcfbea179817c448c8c4a2af2.jpg

CdR0Gr7WIAAZuyr.jpg

CdR0G1cXEAAkYLP.jpg

Edison Robot

Edison Robot

Subject: Digital Technologies

Year Level: F-6

Strand: Both Digital Technologies processes and production skills and Design and Technologies

Sub strand: The Edison Robots can be used across all ages and many strands and sub strands of the Western Australian Curriculum.

Link to the resource:

http:// meetedison.com

https://www.mindmeister.com/823700803#

Cross curriculum priorities and general capabilities:

Critical and creative thinking, Personal and social capability, Information and Communication Technology (ICT), Literacy, Numeracy

Links to other learning areas:

Science, Mathematics, English, The Arts

Interesting information about this resource:

Western Australia’s Scitech hold inexpensive Professional Learning workshops throughout the year which enable teachers to upskill themselves not only on the technology supplied by the Department of Education in the new technology kits but also more (ie Beebots, Dash and Dot robots, Edison robots, Makey Makey kits, Sphero robots, Hummingbird robotics kits, mBots, Lego EV3, LittleBits). Scitech workshops are often recognised by the Teachers Registration Board of WA as professional learning hours.

Qualified staff from Scitech will also attend schools and run incursions introducing the Edison Robots to the students and teaching them the basics.

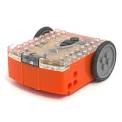
Edison Robots have wheel encoders which allow Edison to travel specific distances at exact speeds. Edison is able to  turn to specific angles (using EdPyApp.com) and drive straight. It has a clutch in each gear box that prevents damage to the gears if the wheels are forced around. It has long range obstacle detection and a clap sensor. Edison comes with graphical programming software (EdWare) and newer software is often realised to complement EdWare ie EdPy – a free Python based programming environment for Edison which is designed to introduce students to a written programming language.

Other features of the Edison Robots are:

  • FREE robotics lesson plans
  • FREE robotics activity mat
  • FREE EdBooks
  • LEGO® compatible
  • Easy to use – suitable for all ages

A classroom activity using this resource:
Introducing the Edison Robots into the lower primary classes as a “toy” not only gains the students’ interest but it also enables the teacher to use computational language within the classroom in a less intimidating game situation.      

In small groups the teacher can guide the students to design a bulldozer using Lego pieces attached to the Edison Robot. Once designed and built they can then use the programming software (with the help of the teacher) to instruct the bulldozer to move extra Lego pieces from one area to another. Ideas are only limited by the imagination, you can even program it to do a drawing by attaching a pencil!

How to use this resource:

The Edison Robot can be purchased through https://meetedison.com, this site is also where information on using this resource is found.

The programming can be done using numerous free software applications and is easy to do due to the drag and drop graphical icons.

The robots are able to be updated with the free firmware updates that will fix bugs or add new functionality.

Architects in the Making with MagicPlan


Subject: Design and Technologies
Year Level: Upper Primary
Strand: Process and production skills
Sub strand: Creating solutions, Designing – Generate and record design ideas through describing, drawing, modelling and/or a sequence of written or spoken steps.

Link to the resource
https://itunes.apple.com/au/app/magicplan/id427424432?mt=8

Cross curriculum priorities and general capabilities
Critical and creative thinking
Personal and social capability
Information and communication technology
Numeracy

Links to other learning areas
Mathematics

A classroom activity using this resource
This is an easy-to-use app that allows you to design and create floor plans and room layouts.  Students can create floor plans using given criteria or dimensions and design furniture layout solutions to best suit the room. It is a great way to make problem solving fun and interactive as well as allowing students to visualise their designs. Due to some more complex features of the app, I would recommend it for the upper primary years only.
With strong links to mathematics (measurement and geometry), students can work collaboratively to find solutions to real-life problems in renovations, building design/construction and engineering. Students may be given specific criteria they must include/adhere to (such as dimensions, size/type/amount of furniture, number of rooms, toilet not next to kitchen and so on) and then they are encouraged to combine their creativity with their problem solving skills to come up with a functional design.

How to use this resource
You start by either:
– Using the camera to ‘capture’ a room – this is a quick, accurate and clever feature where the camera takes estimations of dimensions of an actual room;


– Drawing a room by choosing your own dimensions and either modifying a rectangular room  or by freely drawing it to specific dimensions; or
– Importing an existing plan upon which you can draw over.

Once you have your desired room you can begin to add other rooms to your floor plan (kitchen, dining, living, hall, master bedroom, closet, balcony, garage, upstairs etc) OR you can work on one room at a time.
You then begin inserting objects such as doors, windows, structural features (such as stairs), appliances, kitchen cabinets, furniture, electrical (lights, power sockets), flooring and painting and so on, all of which you can alter the dimensions and position in the room.
At any time, you can add/remove/relocate rooms on your floor plan as well as check and edit the dimensions (including the perimeter) of the room. Finished designs can then be printed.


SPHERO SPRK – NOT JUST A TOY

Subject: Digital Technology
Year Level: 1-6

(adapted purpose and applications for every year level)

Strand:Digital Technologies processes and production skills

Sub strand:Digital Implementation


What is it?

Sphero SPRK is the latest model of Sphero.

Sphero is very basically; a programmable ball. The sphero is a coding robot that is controlled by a remote control smart device such as an iPad through a range of applications with varying purposes.

The Sphero SPRK has a transparent design allowing students to see the inner mechanics of the robot. With features such as LED lights and inductive charging it is attractive and easy to use. The mechanics of the Sphero allow it to spin at various speeds and directions as directed by the application (Android, IOS or Amazon fire) which remote-control the ball.

The first and maybe the most important reason to use the Sphero ball in an education setting, is that it’s fun. It is a great way to engage students of any age or level with both digital technology, coding and multiple other learning areas.

The Sphero SPRK can be used and manipulated to support students learning in so many ways. Some of these ways are listed below:

  • It can be used to teach and practice coding.
  • It can be used in the Arts for painting and creative tasks.
  • It can be used to simulate solving a maze.
  • It can be used in the early years for learning colours.
  • It can be used to learn about shapes
  • It can be used to reinforce and practice angles (mathematics) in a practical way

https://www.youtube.com/watch?v=YHVSX0ABWWE


Link to the resource

www.sphero.com/education


Content Descriptor Example

Design, modify, follow and represent both diagrammatically, and in written text, simple algorithms (sequence of steps) involving branching (decisions) and iteration (repetition) (ACTDIP019)


Cross curriculum priorities and general capabilities

Critical and creative thinking

Personal and social capability

Information and Communication Technology (ICT)

Literacy

Numeracy


Links to other learning areas

English

Mathematics

The ARTS

Science


Skills developed

Coding

Practical use of angles

Problem Solving

Creativity

Arts skills such as drawing, design, colours and painting


Applications

Sphero (https://itunes.apple.com/au/app/sphero/id468699619?mt=8)

SPRK Lightning Lab (https://itunes.apple.com/au/app/sprk-lightning-lab-programming/id1017847674?mt=8)

Sphero Macrolab (https://itunes.apple.com/au/app/sphero-macrolab/id519917219?mt=8)

Sphero Draw N’ Drive (https://itunes.apple.com/au/app/sphero-draw-n-drive/id481029316?mt=8)

Sphero Golf (https://itunes.apple.com/au/app/sphero-golf/id481034508?mt=8)

Sphero Cam (https://itunes.apple.com/au/app/sphero-cam/id481040248?mt=8)


Geoboard

Geoboard App

Subject: Digital technologies

Year level: F-6

Strand: Processes and production skills – Sub-strands: Designing, Producing and implementing

Link: https://itunes.apple.com/au/app/geoboard-by-math-learning/id519896952?mt=8

http://www.mathlearningcenter.org/web-apps/geoboard/


Cross curriculum priorities: Mathematics

General capabilities:

Literacy

Numeracy

Information and Communication Technology (ICT) capability

Critical and Creative Thinking

How to use this idea in the classroom:

Mathematics: Commonly used to explore basic concepts in plane geometry such as area, perimeter and the characteristics of triangles and polygons. Geo boards can be used in the foundation and early years for familiarizing students with different shapes and giving them an opportunity to create their own shapes. In the later years, this app and website can be used to represent and practice problems involving fractions.

During the foundation years of school, these geo boards can be used in order to develop fine motor skills and foster a positive relationship with mathematics.

Plastimake

Using Plastimake in the Classroom

Subject

Design and Technology


Year Level

3/4 and 5/6


Strand

Design and Technologies Processes and Production Skills


Sub strand

Processing and Implementing

Select, and apply safe, procedures when using a variety of components and equipment to make solutions


Link to Resource

https://www.plastimake.com/


Cross Curriculum Priorities and General Capabilities

Numeracy, Information and Communication Technology (ICT) capacity, Critical and Creative Thinking, Personal and Social Capacity and Sustainability


Links to other Learning Areas

Science, The Arts


A classroom activity using this resource

Plastimake is a great resource to have and use in a classroom. An example of the many activities you can do with the Plastimake is linking it to the Science Curriculum when teaching Biological Science. In Year 4, students will be learning about features and adaptations an animal has to help them survive in their environment (ACSSU043). Getting the students to actively create the features and adaptions of different animals is a great way to introduce the topic and spark student interest. For example when students are creating a bird, pose the question what features do birds have? Why are those features important for their survival? Students will be following the procedure of how to use the Plastimake safely as well as creating something they have thought actively about. This hands on lesson is a great way for students of all levels to participate in as well as using the Technologies (Design and Technologies) Curriculum and the Science Curriculum together.


How to use this resource

In order to use this resource in the classroom, you will simply need to order the Plastimake from the website (linked above) and have a bowl of hot and cold water. Plastimake is non-toxic, very strong and biodegradable so is safe for students to use right at their desks, no newspaper required! The only danger in in using Plastimake in the classroom is making sure students do not put their hands in the hot water and they wait for their Plastimake creation to cool before touching it (only takes a few seconds to cool).

When you get the Plastimake you will notice they start off as small white pellets. These small pellets, when put in the warm water, will become transparent. Once the pellets have stuck together, use a fork or other implement to take the Plastimake out of the water and let it cool for a few seconds. Once cool, students can then mould and create the Plastimake into the shape they want. Once students are happy with their creation, it gets placed into the cold water until it hardens. Once it hardens, students can paint their creation and have a well presented final product.

The great thing about Plastimake is how lightweight but highly durable it is. Another great thing about Plastimake is if you are unhappy with the creation, simply place it back into the warm water to reuse and then remould. Plastimake is quick and easy to use, reusable, strong, non-toxic, versatile and clean and is a great resource to use when teaching Design and Technologies.


CODE Artist

Subject: Digital technologies

Year level: 5

Strand: Digital technologies processes and production skills

Sub strand: Digital implementation

Link to resource: https://studio.code.org/s/artist/stage/1/puzzle/1

Cross curricular priorities and general capabilities: Critical and creative thinking, Numeracy,  Information and Communication Technology, Literacy.

Link to other learning areas: Art, mathematics.

A classroom activity using this resource:

Students could use this activity to create an artwork that incorporates geometric shapes and patterns into mathematics lessons. Incorporation of Art and Numeracy subject areas within a technological context allows for computational thinking, differentiation, engagement and motivates students to become creative, scaffolding critical thinking opportunities. Teachers could encourage students to first engage with the tutorial as they follow the step by step introduction, and then ask students to create their own code that others have to explore. This activity could also be used flexibly as students can create visual representations (via shapes) of chosen concepts in other learning areas they are currently involved in. This resource is available on iPad, iPhone and computers.

How to use this resource:

Open the link presented above.

  • Read the introductory bubble that help to introduce the game.
  • Choose the block with the correct action on it and place it into the work space.

  • Press the orange button labelled “run” and see if you are correct.

  • If you are incorrect, follow the hint and prompts until you correctly place the blocks
  • Continue onto the next shape, developing your shapes skill set and artistic flare.


Kodable

Subject: Technologies

Year Level: Pre-primary-5

Strand: Digital Technologies

Sub Strands:  

  • Process and Production Skills
  • Knowledge and Understanding

Content Descriptors Examples:

  • Digital implementation – (year 3) Use visually represented sequenced steps (algorithms), including steps with decisions made by the user (branching) Create and communicate ideas and information safely
  • Representations of data – (pre-primary) Data can have patterns and can be represented as pictures and symbols

Cross Curriculum Priorities and General Capabilities:

  • Critical and Creative Thinking
  • Information and Communication Technology
  • Literacy
  • Numeracy

Links To Other Learning Areas:

  • Mathematics
  • The Arts (Media Art)


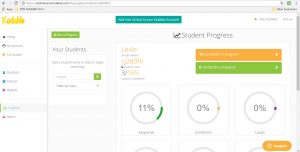
Kodable is a fun and engaging coding website designed for use by teachers and parents (click HERE to launch the Kodable website). It can be set up for use as a class technology teaching tool where students can work through coding levels that gradually increase in difficulty. The results are recorded and can be easily accessed by the teacher to monitor the individual students progress.

It is easy to set up and use and the bright graphics and easy to follow instructions make it very user friendly. Students use directional symbols in the correct order to instruct the Kodable monster which way to move throughthe maze. Reward coins can be collected along the way and use to purchase new monsters

There are structured lesson plans for each year group for the teacher to follow and detailed resources that support the lessons. Each child has an individual login so the site can also be accessed at home.

The “Kick start” introductory offer contains 6 weeks of lesson plans and online activities. After this time the cost is $300 for 42 weeks of student lessons and scaffolded curriculum (US curriculum).

Storybird – Creative story writing for all

Subject: Design and Technologies

Year Level: F-6

Strand: Digital Technologies – processes and production skills

Sub-strand: Design and Generation

2.6 Visualise, generate, develop and communicate design ideas through describing, drawing and modeling

4.6 Generate, develop, and communicate design ideas and decisions using technical terms and graphical representation techniques

Link to Resource: http://storybird.com

Description:

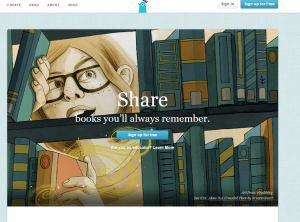
Storybird is an online story making resource. Students are able to create their own stories, while also being able to read stories which other users have uploaded to the site. Students are able to add text to their stories while also being able to select and drag pictures into the document. Once the book is complete students are then able to upload their story for their classmates to read along with other Storybird users.


How to create a story:
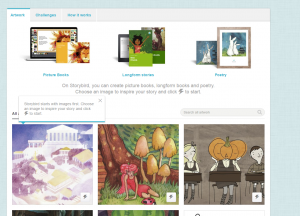
Click on the create tab in the top left corner

DTM


Select an image to inspire your story. Click the lightning bolt to start

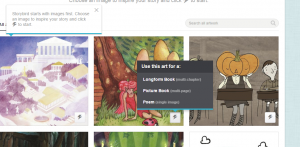
DTM 2


Choose to create either a Longform book, picture book or a Poem
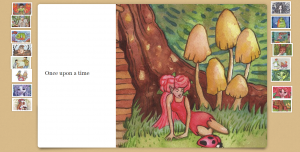
DTM 3


Choose the image you wish to use from the picture provided and begin to write your story

DTM 4


Pictures and sounds can be added to make your story as creative as possible. Once your story is complete, you are given the option of saving, publishing, downloading or printing the document.

DTM 5


Cross Curriculum Priorities and General Capabilities:

Depending how story bird is used. All three cross-curricular priorities can be incorporated. Storybird also allows for all seven of the general capabilities to be used.


A classroom activity using this resource

Storybird allows students to use the pictures provided as an inspiration for their story. These pictures are great in developing student’s creative storytelling/writing skills. This is a great tool for students who go blank when trying to determine the beginnings of a story. As students experiment with this online tool they will begin to brainstorm ideas of how they would like the characters, setting and plot to be depicted. Students are able to share their stories with classmates as well as other storybird users.


Links to other leanring areas:

Storybird is primarily an English resource, however all subjects can be incorporated when using Storybird. This can be achieved by tailoring the subject students are reading and writing about.