WONDERful WORKSHOP

Wonder Workshop is WONDERFUL – see what I did there?


Inspiring the up and coming generation in using digital technologies can be a challenge at times, especially with maintaining attention.  But Wonder Works provides colourful and engaging resources which develop students confidence and competency in using and manuvering their skills with digital technology.

Subject

Digital Technologies

Year Level

Foundation to Year Two

Strand

Knowledge and Understanding

Sub Strand

Recognise and explore digital systems (hardware and software components) for a purpose

Resource Link

https://www.makewonder.com/play/ideas/

Price

Free resource information – price varies on suggest apps for lesson plan templates


Cross Curricular Capabilities

The resources suggest that these apps can assist in most learning areas as it is used to consolidate content specific learning which fosters play based learning.

For Example – Using Go App


English: – Literacy (Foundation – Year 2)

Comprehending texts through listening, reading and viewing
  • Interpret and analyse learning area texts
  • Navigate, read and view learning area texts
Composing texts through speaking, writing and creating
  • Compose spoken, written, visual and multimodal learning area texts
Word Knowledge
  • Understand learning area vocabulary

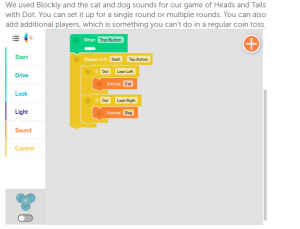
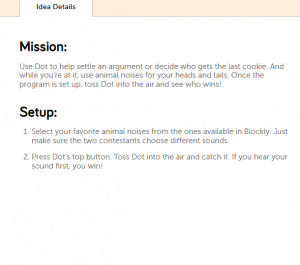
For example – Using Blockly


Math: Chance ( Year one and two)

Year One – Identify outcomes of familiar events involving chance and describe them using everyday language such as ‘will happen’, ‘won’t happen’ or ‘might happen’

  • justifying that some events are certain or impossible

Year Two – identify practical activities and everyday events that involve chance. Describe outcomes as ‘likely’ or ‘unlikely’ and identify some events as ‘certain’ or ‘impossible’

  • classifying a list of everyday events according to how likely they are to happen, using the language of chance, and explaining reasoning


Easy Lesson Plans

Example –  Heads or Tails


How can I introduce the language of coding to my classroom?


Even the simplest concept of, if this, then that, may be new and confusing to junior primary students. So what is a fun and simple way to introduce coding language into the classroom?

Through the use of games.

Board games like snakes and ladders model coding such as, if it is my turn, then I roll the dice, if I get a 3, then I move three spaces, if I land on a snake, then I go down it. However they are purely games of chance and do not allow the student to learn from their mistakes.

Digital games however, often do offer students an opportunity to try various solutions and learn through trial and error. One such game is the Crazy Gears app from Edoki Academy.

Classroom Activities

Using one tablet in the classroom a teacher may display the game on their smart board and have students direct their next move and predict results using the language of coding, “If I move this gear, then what will happen?”  Teachers may also model and introduce writing code as the students direct them, “It didn’t work, let’s look at the steps we wrote down and see where we went wrong, and what we need to change.” Bright, colourful and engaging, Crazy Gears increases in complexity as it progresses, adding more steps to each level of code. Once mastered it would also be a great tool for independent activities.

Curriculum Details

Subject:  Technology

Year Level:  1

Strand: Digital Technologies – Processes and skills

Sub Strand: Creating solutions by – Collaborating and managing. “Works with others, or independently, to safely create and share a sequence of steps for making a solution” (SCSA, 2015)

Useful links

School Curriculum and Standards Authority- Technology Curriculum Outline for Western Australia:

http://k10outline.scsa.wa.edu.au/home/p-10-curriculum/curriculum-browser/technologies/digital-technologies2

School Curriculum and Standards Authority- Technology Curriculum Scope and Sequence for Western Australia:

http://k10outline.scsa.wa.edu.au/home/p-10-curriculum/curriculum-browser/technologies/digital-technologies2/technologies-overview/Technologies_P-10_Scope-and-Sequence_March_2016.PDF

Edoki Academy

https://www.edokiacademy.com/en/app-montessori/discovery/crazy-gears/

Lightbot: Programming Puzzles

images

Subject: Digital Technologies

Year Level :1-2

Strand: Digital Technologies processes and production skills

Sub strand: Digital implementation

Use data to solve a simple task/problem (ACTDIP003)

Links to the resource: Available on Apple, Android and Windows platforms

https://itunes.apple.com/us/app/lightbot-programming-puzzles/id657638474?mt=8

https://play.google.com/store/apps/details?id=com.lightbot.lightbotjr

https://www.microsoft.com/en-au/store/p/lightbot/9wzdncrdlwrp

General capabilities:

Numeracy; ICT; Critical and creative thinking; Personal and social capabilities

A classroom activity using this resource

Lightbot is a programming puzzle game which provides a fun way for students to apply computational thinking through problem solving challenges. The game is suited to both independent and paired work, therefore making it ideal for rotations or a whole class activity. It can be modelled on a IWB before students attempt the puzzles themselves, and is a great way for students to consolidate their understanding of basic algorithms. It comes with 50 different levels to suit students of different abilities, and there is a junior version to suit remedial groups.

How to use this resource:

iLearn2. (2015). Primary programming with iPad using Lightbot- video tutorial. Retrieved from https://www.youtube.com/watch?v=6VYlW3LvO0U


Tynker

TynkeTynkerLogo_Fotorr is a browser-based application used to teach your students how to program as they create games and animated projects. Tynker can be used on any computer (desktop, laptop, notebook, Chromebook) with an internet connection. It can be used on an iPad, however some features are not supported. As it is browser-based, it works best in Google Chrome and Safari browsers.
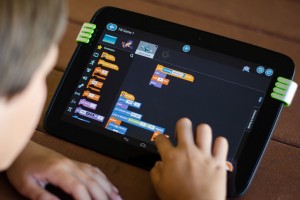
Students can easily learn to code using the visual programming language by solving fun puzzles and creating original projects and games. Students gain an excellent foundation in programming and computational thinking, preparing them to transition to any mainstream object-orientated programming language.

Tynker has multiple learning modules; allowing students to work at their own pace, with each lesson is designed to run between fifty and sixty minutes. As it is browser based, students are able to work from home if the activity is not completed within the specified lesson. Tynker has been created to keep students engaged from start to finish and Tynker also caters for a variety of learning styles.

Teachers are able to assess their students’ learning through creating a multiple-choice questionnaire at the end of a module.

Each student is able to create a unique project, which can then be shared with friends and family.

For more information on Tynker, visit: https://www.tynker.com/?t=reset

    Subject: TechnologiesTynker

    Strand: Digital Technologies – Knowledge and Understanding

    Sub-Strand: Representation of data

    Year level: Year one to year six


Cross-curriculum priorities and General Capabilities:

  • Literacy;
  • Numeracy;
  • Information and Communication Technology;
  • Critical and Creative Thinking; and
  • Personal and Social Capability.

Links to other learning areas:

  • English;
  • Mathematics;
  • Science; and
  • The Arts (Visual Arts). 

How to use Tynker:

Visit the Tynker YouTube channel for a variety of short videos, including how to get you and your class started: https://www.youtube.com/channel/UC2MAKe5X7pohhiMZ4nzdInA

Below are a couple of suggested YouTube clips for you to view:

What is in a Tynker lesson: https://www.youtube.com/watch?v=Bko9qtCeb2A

Preparing for your first Tynker lesson: https://www.youtube.com/watch?v=ZmTbED57tes


References:

ACARA. (2015). Australian Curriculum. Retrieved from http://v7-5.australiancurriculum.edu.au

SCSA. (2014). Digital Technologies. Retrieved from http://k10outline.scsa.wa.edu.au/home/p-10-curriculum/curriculum-     browser/technologies/digital-technologies2

Tynker. (2015). Tynker – Programming courses for kids. Retrieved from https://www.tynker.com

Tynker. (2016). Tynker. Retrieved from https://www.youtube.com/channel/UC2MAKe5X7pohhiMZ4nzdInA


World Worm

Download the full Word version: Virtual Task 3


Australian Curriculum outcomes:

  • To investigate and play with technologies, materials and systems used to identify properties and create designed solutions for personal and local community needs
  • Living things live in different places where their needs are met (ACSSU211)
  • People use science in their daily lives, including when caring for their environment and living things (ACSHE022)

Learning Area: Biological Science/Critiquing exploring and investigating ideas
Learning Experience Focus: Science/ Design and Technologies Processes and Production Skills

Using the app

Step 1: Locate classroom Ipads

Step 2: Enter App store and type in Worm World into the search engine

Step 3: Install the ‘Worm World’ App

You are now ready to conduct your lesson!!

Sit your students down with their Ipads and together navigate through the worm world welcome page and through the initial instructions with the students. Remember to show the students that you can pause and recommence the game at any time.

This lesson can be effectively implemented into the Year 1 Science and Design and Technology Curriculum as it teaches student cause and effect, as well as how to sustain growth and care for living animals. It allows students to discover the necessary means to support a plant structure by creating fertile soil and maintaining soil levels and worm production in a virtual sense. This can lead to a whole class project to create a real worm farm and harvest the fertiliser for a vegetable garden or other food produce such as herbs or fruit gardens.

Elaborations:

  • Students relate science to human activities in the home and school, such as caring for garden plants and animals.
  • Identify products that can be designed and produced from plants and animals for example fertiliser from worm farms.
  • Demonstrate how science is used in activities such as caring for plants and animals.
  • Students identify that soil is a type of habitat that supports living things.

References:

Australian Curriculum Assessment and Reporting Authority. (2013, February). Draft Australian Curriculum: Technologies. Retrieved from Australian Curriculum: http://consultation.australiancurriculum.edu.au/Static/docs/Technologies/Draft%20Australian%20Curriculum%20Technologies%20-%20February%202013.pdf

Australian Curriculum Assessment and Reporting Authority. (2014). Australian Curriculum Science Year 1. Retrieved from Australian Curriculum: http://www.australiancurriculum.edu.au/Science/Curriculum/F-10#level1

Brisbane City Council. (2012). Worm World. Retrieved January 10, 2014, from Scootle.com: https://www.scootle.edu.au/ec/viewMetadata.action?id=M016807&q=worm+world&topic=&start=0&sort=relevance&contentsource=&contentprovider=&resourcetype=&v=text&showLomCommercialResources=false&field=title&field=text.all&field=topic&contenttype=all&contenttyp

Designing a Vegetable Garden

Download the full Word Version: Planning a Vegetable Garden

Goal:  

Students will individually and collaboratively engage in the rich task of planning and designing a classroom garden. They will construct a bird’s eye view of a garden bed, building their knowledge of mapping.

Learning Area:

Design and Technologies knowledge and understanding

Learning Experience Focus:

Food and fibre production

Content Descriptor:

2.3 Investigate sustainable systems of care for plants and animals that are grown, raised and processed for food, clothing and shelter for an identified purpose.

Cross-Curriculum Opportunities:

Numeracy, Critical and creative thinking, Personal and social capability, Sustainability.

Resources:

This Year’s Garden by Cynthia Rylant

Posters –        Vegetables that can be planted in Spring

My Vegetable Garden – a bird’s eye view

Examples of seeds we can plant

A3 garden bed map template (See Below) – optional (this doesn’t allow for a variation in the layout of the garden bed. It has been included to allow for time constraints and to assist students that require the template for guidance).

Drawing and writing materials

Vegetables to sample

New vocabulary:

Bird’s eye view: viewing an object from above, as though the observer were a bird.

Introduction: 13mins

To assist the students to begin thinking about the cycle of a garden and the planning of a garden read This Year’s Garden. Discuss with the students what was planted, when the plants were planted (season) and what was required to maintain the garden.

Have the students relate their own experiences – prompt with: who has a vegetable garden at home or knows of someone that does (grandparents)? Why would we grow vegetables in or garden (health, fitness, hobby, aesthetics)? What are your favourite things about having a vegetable garden? Explain that the students will be creating a class vegetable garden which they will plan, design and plant themselves (next lesson).

Discuss the various types of gardens (flower, native, vegetable, herb) and what might be required to make the garden (soil, fertiliser, seeds/plants, water, sun/shade, gardening tools). What do we need to allow for when planting a garden (sun/shade, season, space)?

Introduce the poster “Vegetables that can be planted in Spring”. Discuss with the students which ones they have eaten. Provide a sample of some of the vegetables the students can plant for them to eat.

Body: 40 mins

Introduce the term “bird’s eye view” and ask if the students know what it means. Display the poster “My Vegetable Garden – a bird’s eye view”. Discuss the view, explaining that the students will be illustrating and labelling their ideal vegetable garden from the same view – like a bird looking down from above.

Refer the students back to the discussion regarding requirements

  • What would you like to plant? (examples on the poster “Vegetables that can be planted in Spring”)
  • How many of each plant would you like in your garden?
  • How much space do these plants require?

Provide each student with an A3 garden bed map template. They will need lead pencil, eraser, coloured pens and coloured pencils. Students should refer to the posters to assist with the layout and illustrations.

Allow half an hour for this task. Students should be directed to draw the illustrations in lead pencil before outlining in coloured pen. Labelling and providing a title should be completed before colouring in the illustration. Students that don’t complete the task can continue during “free time”.

Conclusion: 7 mins

Discuss with the students the variations in their garden beds and how they can combine the ideas to make the class garden.

Using the whiteboard create a list of all the vegetables selected from the students’ gardens. Add a mark to the vegetable each time it has been selected by a student. Tally up the marks and highlight the top 5 vegetables chosen. These will make up the class garden. Revisit what will be required to construct the garden.