Acquire, store and validate different types of data, and use a range of software to interpret and visualise data to create information (ACTDIP016)
Examine the main components of common digital systems and how they may connect together to form networks to transmit data(ACTDIK014)
Scratch is a Coding program that can be used in the classroom, to teach the basics of coding computers, however can also progress into more difficult coding projects as well. Scratch can be used by students will varied levels of capabilities, and is a fantastic tool for peer mentoring.
The program is both an online program accessed through Google Chrome (or FireFox) and can also be downloaded as a program onto any Desktop/Laptop computer.
The program allows uses to create stories, games and animations. Scratch could be used as a platform for students to present assignments as well as create interactive quizzes and games to be shared with peers.
The online version is fantastic, as it has tutorials for students (and teachers) of different levels of ability. The tutorials go through step-by-step processes in order to achieve the set out goal.
As an educator, have you ever felt something missing from your teaching, that one thing that connects you to your students’ thoughts and imaginations? Do you facilitate students’ expression of creativity and inventiveness? Is your planning reflective of opportunities for students to articulate their inspirations and aspirations? For generations, Lego has endorsed the importance of accelerating childrens’ imaginations through creative play. With the mission statement of ‘Inspire and develop the builders of tomorrow’ Lego has moved from the confines of our homes and into the classroom with Lego Education.
Lego Education introduces WeDo 2.0, a valuable resource where students are encouraged to explore and build brick by brick, and then innovate through computers and coding. From the moment they begin building, students are engaged in the process of computational thinking, using digital software to problem solve as well as their curious imaginations to create. To begin with, students follow instructions of what to build, how to build it and step by step sequencing using the accompanying computer program. Once they understand the basic framework of Lego Education, they are then free to explore using their imaginations to create.
YOU are facilitating their learning of design and digital technologies as they imagine, create and play. YOU are providing valuable moments for your students to access digital technology in a meaningful way, with determination and purpose.
How to use this resource
Students follow the steps to assemble their creations.
Teacher assists in connecting to an iPad or laptop.
Log into the LEGO Education software.
Students use coding to manipulate and control their creation.
Strand: Digital Technologies: Processes and production skills
Sub strand: Digital Implementation: Use visually represented sequenced steps (algorithms), including steps with decisions made by the user (branching) (ACTDIP011)
Link to the resource:
https://scratch.mit.edu
Cross-curriculum priorities and general capabilities:
Numeracy
Information and Communication Technology (ICT) Capability
Critical and Creative thinking
Links to other learning areas:
Mathematics, Science
A classroom activity using this resource:
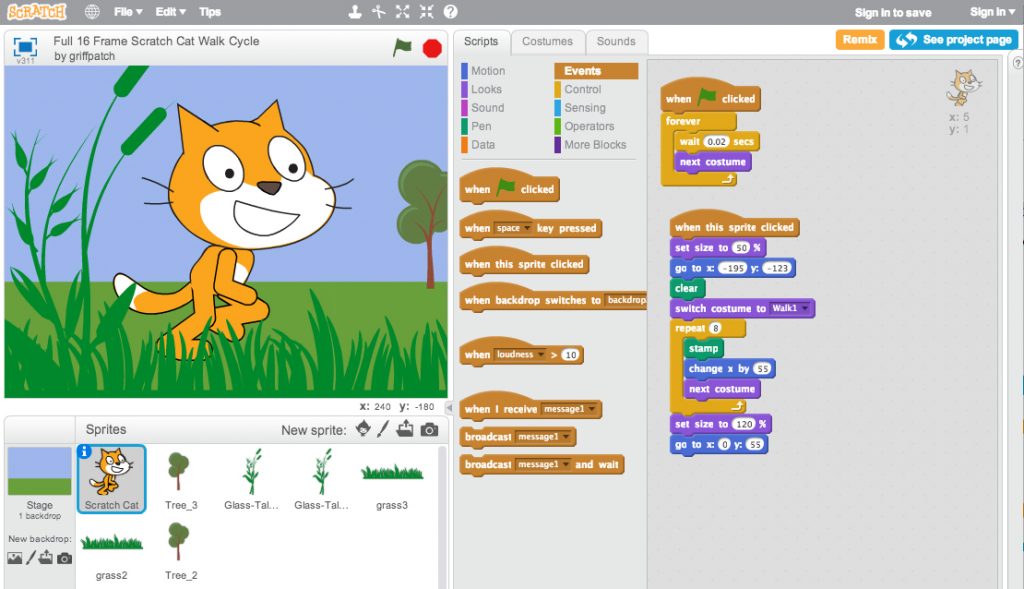
This resource is a great way to introduce, or extend, students’ ability to code and develop their design and computational thinking skills. The resource can be as simplified or extensive as each student requires, making it suitable for a large variety of age groups. Students maintain engagement as they create a sequencing of operations that are of interest to them, including character choice, setting, movements, etc. Students are required to generate a sequence of animations by choosing individual steps to create a whole animation. It encourages students to use their systematic, creative and logical thinking skills, and to identify how to break down and evaluate coding skills. Students can easily access this site using computers, iPads or mobile phones. It provides clear instructions and hints for how to create a wonderful animation.
How to use this resource:
Firstly, you will need to visit the website provided above. You will come to the home page.
You then need to select “Create” at the top
Then it is simple. Select your aviator, and plan a sequence of animations for this aviator by using the codes available. You can change the settings, change the aviator, change the type of actions performed by the aviator.
There are tutorials on the right hand side if you need assistance.
Add aviators, movements and sounds to create your fun animation.
Design and Technologies Processes and Production Skills
Sub strand
Processing and Implementing
Select, and apply safe, procedures when using a variety of components and equipment to make solutions
Link to Resource
https://www.plastimake.com/
Cross Curriculum Priorities and General Capabilities
Numeracy, Information and Communication Technology (ICT) capacity, Critical and Creative Thinking, Personal and Social Capacity and Sustainability
Links to other Learning Areas
Science, The Arts
A classroom activity using this resource
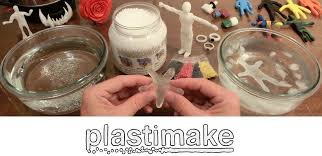
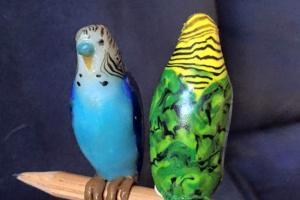
Plastimake is a great resource to have and use in a classroom. An example of the many activities you can do with the Plastimake is linking it to the Science Curriculum when teaching Biological Science. In Year 4, students will be learning about features and adaptations an animal has to help them survive in their environment (ACSSU043). Getting the students to actively create the features and adaptions of different animals is a great way to introduce the topic and spark student interest. For example when students are creating a bird, pose the question what features do birds have? Why are those features important for their survival? Students will be following the procedure of how to use the Plastimake safely as well as creating something they have thought actively about. This hands on lesson is a great way for students of all levels to participate in as well as using the Technologies (Design and Technologies) Curriculum and the Science Curriculum together.
How to use this resource
In order to use this resource in the classroom, you will simply need to order the Plastimake from the website (linked above) and have a bowl of hot and cold water. Plastimake is non-toxic, very strong and biodegradable so is safe for students to use right at their desks, no newspaper required! The only danger in in using Plastimake in the classroom is making sure students do not put their hands in the hot water and they wait for their Plastimake creation to cool before touching it (only takes a few seconds to cool).
When you get the Plastimake you will notice they start off as small white pellets. These small pellets, when put in the warm water, will become transparent. Once the pellets have stuck together, use a fork or other implement to take the Plastimake out of the water and let it cool for a few seconds. Once cool, students can then mould and create the Plastimake into the shape they want. Once students are happy with their creation, it gets placed into the cold water until it hardens. Once it hardens, students can paint their creation and have a well presented final product.
The great thing about Plastimake is how lightweight but highly durable it is. Another great thing about Plastimake is if you are unhappy with the creation, simply place it back into the warm water to reuse and then remould. Plastimake is quick and easy to use, reusable, strong, non-toxic, versatile and clean and is a great resource to use when teaching Design and Technologies.
Strand: Knowledge and Understanding, Process and Production Skills
Substrand: Food and Fibre Production
Content Descriptor Example: Types of food and fibre produced in different environments, cultures or time periods, including the equipment used to produce or prepare them (ACTDEK012). Past performance, and current and future needs are considered when designingsustainable food and fibre systems for products (ACTDEK021).
Cross-Curriculum Priorities:
Sustainability
General Capabilities
Literacy
Critical and Creative Thinking
Personal and Social Capability
Ethical Understanding
Links to other learning areas
Health and Physical Education
Science
English
Mathematics
Art
Click the picture above to open the ‘creating a food garden’ resource
The Junior Landcare website provides teachers, students and parents with information about how to improve and look after the current and future environment. It is easy to read and navigate through the website. There are a heap of resources and links providing you with more ideas and inspiration. This resource is perfect for integrating Sustainability into the classroom and developing students ethical understanding. Landcare Australia also have a Youtube channel where there are a number of videos about Australia and the environment we live in. Perfect to guide student discussion developing knowledge and understanding.
What is Junior Landcare?
Junior Landcare was created by Landcare Australia in 1998. This was created to encourage young people to play an active role in conserving current land to ensure a safe future environment. Junior Landcare encourages young people to be accountable for their actions and take responsibility of their future environment. Junior Landcare provide a range of days where students can volunteer and assist in creating a better future. The best thing about Junior Landcare, is that it links straight in with the curriculum. So you know that the students will benefit academically from the experience. The L.I.F.E website also provides event days where students can volunteer or you could create your own event to get people together. Discover more in the video below.
How you could use Junior Landcare in the Classroom
There are multiple resources on Junior Landcare that would be useful in the classroom. An activity that would provide multiple linked activities as well as benefit the actual school is to create a food garden. Creating a food garden involves multiple steps that can incorporate many other learning areas. Students would begin with investigating and defining when discussing potential ideas to create a food garden. Write all of their ideas down and discuss why some things might work better than others. Involve Mathematics by designing a to scale 2D drawing of a food garden including labels and technical terms. Now its time to produce and implement the design to create the food garden with the safe use of tools and equipment. Incorporate Science where students evaluate the growth of the food garden and ask questions like, ‘what could be done to improve the growth’. This will provide students with a collaborative and hands on experience. After the garden is created you can involve Art by drawing a birds eye view of the garden or involve English by writing a procedural text on how to create a food garden. There are so many possibilities with creating a food garden.
TIPS
Gather extra helping hands! Engage with parents and the school ground keeper to see if they can help create the masterpiece.
Create a rotating roster for students to water and look after the garden. Otherwise you will spend half the afternoon everyday doing it yourself.
Something extra…
Download and have a read of the Teacher’s Resource Guide.
Check out this classroom blog where they have created their own food garden for inspiration and ideas.
Junior Landcare. [2015]. Retrieved from https://landcareaustralia.org.au/junior-landcare/
Landcare Australia. (2015, March 26). Junior landcare hits our tv screens [Video file]. Retrieved from https://www.youtube.com/watch?v=sEwFAwmdAoQ
Landcare Australia. (2014, December 3). Landcare is for everyone [Video file]. Retrieved from https://www.youtube.com/watch?v=NoVv_RMrDzk&t=34s
Landcare Australia. (2016, November 28). Love our Aussie land [Video file]. Retrieved from https://www.youtube.com/watch?v=v6sGGdIQ2SU&t=1s
School Curriculum and Standards Authority. [2014]. Design and Technologies. WA: Government of Western Australia. Retrieved from http://k10outline.scsa.wa.edu.au/home/p-10-curriculum/curriculum-browser/technologies/design-and-technologies2
Define a problem, and set of sequenced steps, with users making a decision to create a solution for a given task.
Create and communicate information, including online collaborative projects, using agreed social, ethical and technical protocols (codes of conduct) (ACTDIP022).
Design, follow and represent diagrammatically, a simple sequence of steps (algorithm), involving branching (decisions) and iteration (repetition) (ACTDIP019)
General Capabilities:
Literacy
Numeracy
ICT
Critical and Creative Thinking
Personal and Social capabilities
Overview:
These robots are a sure fire way to get your kids engaged in the classroom. These robots can easily be operated through the use of iPads or android tablets. All you need is to download the Blockly App and sync the robot to it. The aim of the activity is to promote design thinking within students, it achieves this outcome by allowing the students to work collaboratively in pairs/small groups while designing an obstacle course for the robot to follow. Students will then scatter bowling pins throughout the course and evaluate the best route or path for the robot to knock over all the pins. Students will attempt it multiple times and choose the most effective pathway.
Operating Systems:
Available in both IOS and Android formats
iPads or Tablets required
References:
Cool Mom Tech,. (2015). 9 cool coding projects for kids using Dot and Dash. Cool Mom Tech. Retrieved 11 January 2017, from http://coolmomtech.com/2015/08/dot-and-dash-coding-projects-wonder-workshop/
Introduce your students to coding and continue to develop their skills throughout their primary years!
Use Cork the Volcano to teach students coding and engineering skills. Designed to be played in pairs, students also learn the fundamentals of teamwork, collaboration and participation. Puzzlet’s ‘plan, program, play’ model combines physical manipulation with digital play.
Subject: Technologies
Year Level: K-5
Strand: Digital Technologies
Sub-Strands:
Knowledge and Understanding Digital Technologies:
Explore components of hardware and software, and their use
Structure and representation of data
Process and Production Skills:
Collect, explore and sort data
Follow, describe and represent algorithms
Content descriptor examples:
exploring and identifying hardware and software components of digital systems when creating ideas and information (ACTDIK001)
experimenting with different ways of describing a set of instructions, for example writing two versions of the same simple set of instructions for a programmable robotic device (ACTDIP010)
applying the principles and elements of design to a set of requirements in order to produce a user interface for a system that addresses an identified need (ACTDIP018)
Why use Cork the Volcano in your classroom?
Students begin to think in ways they are not accustomed to while engaging in a game that extends their learning beyond a screen
Students have the opportunity to physically manipulate their codes and see the results of their plan
Availability to curriculum links and lesson plans here
Looking for a fun, innovative, and interactive way of introducing vlogging to the classroom?
Look no further!
Kidzvuz is a safe, carefully monitored site where students from ages 7-12 can Vlog on 🙂
Firstly,
What is this term ‘Vlog’?
A vlog is in fact, a Video Blog.
As defined by Cambridge Dictionary:
[It is] “a record of your thoughts, opinions or experiences that you film and publish on the internet.“
So what is Kidzvuz?
Kidzvuz is a site that facilitates the skills and knowledge for vlogging. Students can use this site to watch, review and create their own vlogs to express their passions and ideas. KidzVuz heavily promotes their philosophy of “letting kids have their say.” Prior to being uploaded, every video and comment is reviewed and approved by the site administrator to ensure a safe, appropriate and positive online environment is kept.
A classroom activity for this resource:
Vlogging opens up many opportunities in the classroom for students to express their interests and opinions confidently through technology. The subject students decide to vlog about can be chosen by the educator or by the students and it can be done individually or collaboratively. In the year 3/4 band description, it is outlined that students need to “develop an understanding of why it is important to consider the feelings of their audiences and apply safe practices and social protocols agreed by the class that demonstrate respectful behaviour.” When introducing Kidzvuz to the classroom, these areas are great to cover and for students to understand the power of influence they can have in their vlogs.
How to use:
Students will need to primarily sign up with the educator/parental consent since this site is heavily supervised. This will then grant access for students to upload vlogs they have created in class to the site for teachers, parents and peers to view. Students can provide encouragement, question or provide constructive feedback to their peers (peer assessment) by commenting on others’ vlogs.
Additional Resources:
Although this may seem like a ‘kid only’ zone, don’t be deceived! There are many resources available for teachers and parents alike! There is a parent blog associated with the site here. In this section, educators and parents can share ideas, resources, advice etc.
The ‘Nitty Gritty’
In alignment with the Australian Technologies Curriculum:
Subject: Technologies
Year Level: 3/4
Strand: Digital Technologies
Sub-strand: Collecting, Managing and Analysing data
Collect, access and present different types of data using simple software to create information and solve problems. (ACTDIP009)
Content Descriptor Example: Use visually represented sequenced steps (algorithms), including steps with decisions made by the user (branching) (ACTDIP011)
General Capabilities:
Literacy
Numeracy
Information and Communication Technologies (ICT) capability
I had never heard of a Sphero until I commenced my third year practicum and had to provide a learning experience involving them. I really had no idea what I was doing, but I quickly learnt that I was just the facilitator during this lesson and the students were in control of their own learning. The students loved the fact that they were teaching me something. All students were engaged in programming and collaborating with their peers to make the Sphero follow their innovative designs they had created.
So, what is a Sphero?
A Sphero is a little robotic ball that can be programmed using an app such as the sphero app, lightning lab or tickle app. You can create a series of instructions using the programming app where the Sphero will then follow the instructions you have created. Sphero can do tricks, dance to music being played, flash different colours AND it is also waterproof and shockproof.
How you could use a Sphero in the classroom
To provide an activity that suits the diversity of students, I would suggest to create a number of self paced challenges that can be completed by the students. Start with simple challenges that slowly progress to more difficult challenges. Students can move on to the next challenge once they have completed the one before. For example, the first challenge could be to program the Sphero to roll in a straight line forward and back. The next challenge could be to make a jump for the Sphero and make the Sphero go over it and return back to the beginning. Create harder challenges by adding corners, hills, obstacles, goals etc. This all depends on what experience the students have with programming. Students will be engaged in computational thinking as they are trying to solve these challenges by formulating the solution.
To incorporate Mathematics, students could design a pathway or maze by creating a 2D drawing to scale. Students can begin creating their pathway or maze using masking tape and items around the classroom making sure they keep to their measurements. They will then need to program their Sphero to complete the pathway or maze. Creating activities like these allow students to work collaboratively and have quality discussions about their understandings. Listening to some of the conversations the students have during this activity can blow you away.
When working with a Sphero, students are investigating, defining and designing their pathway drawing. Students then produce and implement their pathway ready for use considering safety measures. Once they have trialed their pathway, students will evaluate the progress made and discuss what changes need to be made by collaborating and managing.
TIPS
When working in groups, it could be handy to give particular roles to students, otherwise they may spend half the lesson fighting over who gets to do what. These roles could include: programmer, designer, builder, Sphero manager. Then swap the roles around making sure all students have a go at programming.
Allow plenty of time for pack up, otherwise you will be spending half the afternoon doing it by yourself.
Something extra…
Take a look at the Sphero Blog for ideas and inspiration.
Need some assistance with how to use a Sphero? Click here
By Jessica Read
References
School Curriculum and Standards Authority. [2014]. Digital Technologies. WA: Government of Western Australia. Retrieved from http://k10outline.scsa.wa.edu.au/home/p-10-curriculum/curriculum-browser/technologies/digital-technologies2
Sphero. (2016, June 20). Just add imagination [Video file]. Retrieved from https://www.youtube.com/watch?v=hk4HylFFC4c&feature=youtu.be
Sphero. (2015, August 4). What is sphero SPRK edition [Video file]. Retrieved from https://www.youtube.com/watch?v=Yg8LmEkI_0c&list=PLSdn63ba-PlZwLKYDV1I-BaW0ZRqYlXvY&index=5
Sphero. (2016, June 20). Sphero SPRK inspiring in the classroom [Video file]. Retrieved from https://www.youtube.com/watch?v=0yQYr7CIxBc&t=4s
Seesaw is an online platform that can be used on iPads, laptops and computers where students can submit their work online rather than handing in a paper copy. It is a great resource for parents to use as well to monitor their child’s progress in their education. It is beneficial to teachers as you can create student profiles on the app/ website to store their work for future marking. Students can show what they know by uploading a video, picture, voice recording or document about a learning task. Seesaw also support QR codes.