
Subject: Design and Technologies
Year level: Suitable for all year levels
Strand: Materials and technologies specialisations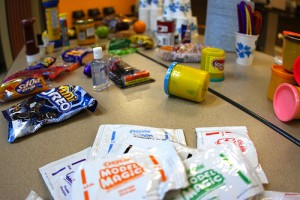
The Technologies contexts content descriptions provide a framework within which students can gain knowledge and understanding about design concepts across a range of technologies contexts. These content descriptions focus on the properties and characteristics of technologies, materials, components, tools and equipment and how they can be used to create innovative designed solutions.
The technologies contexts for Foundation to Year 8 are:
Materials and technologies specialisations.
For example:
– materials, including composites, metal, plastics, wood, smart materials, textiles
– an area of specialisation (for example, architecture, electronics, graphics
technologies, fashion) (See content descriptions 2.2, 4.2, 6.2, 8.3 and 10.3)
(Source: ACARA, 2016)
WA Curriculum Scope and Sequence – Technologies (Materials and technologies specialisation)

General capabilities: Critical and creative thinking
 Critical and creative thinking are integral to activities that require students to think broadly and deeply using skills, behaviours and dispositions such as reason, logic, resourcefulness, imagination and innovation in all learning areas at school and in their lives beyond school.
Experimenting, drawing, modelling, designing and working with digital tools, equipment and software helps students to build their visual and spatial thinking and to create solutions, products, services and environments.
(Source: http://k10outline.scsa.wa.edu.au/home/p-10-curriculum/curriculum-browser/technologies/design-and-technologies2/technologies-overview/general-capabilities)
Product description
What is it?
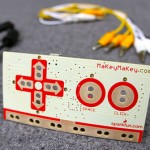
MaKey MaKey is an invention kit for the 21st century. Turn everyday objects into touchpads and combine them with the internet. It’s a simple Invention Kit for Beginners and Experts doing art, engineering, and everything in between utilising creative and computational thinking.
Creators Jay Silver and Eric Rosenbaum from the Lifelong Kindergarten Group describe it best:
(Source: http://www.makeymakey.com/)
What Can I Make?
That’s up to you! First, load up a computer program or any webpage. Let’s say you load up a piano. Then, instead of using the computer keyboard buttons to play the piano, you can hook up the MaKey MaKey to something fun, like bananas, and the bananas become your piano keys.

Watch – Hack a banana, make a keyboard!
How Does it Work?
Alligator Clip two objects to the MaKey MaKey board. For example, you and an apple. When you touch the apple, you make a connection, and MaKey MaKey sends the computer a keyboard message. The computer just thinks MaKey MaKey is a regular keyboard (or mouse). Therefore it works with all programs and webpages, because all programs and webpages take keyboard and mouse input.

What materials work with MaKey Makey?
Any material that can conduct at least a tiny bit of electricity will work. Here are some materials people have used in our workshops including Ketchup, Pencil Graphite, Finger Paint, Lemons, etc.

Other materials that work great: Plants, Coins, Your Grandma, Silverware, Anything that is Wet, Most Foods, Cats and Dogs, Aluminum Foil, Rain, and hundreds more…

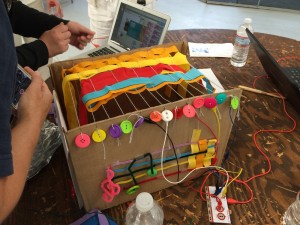
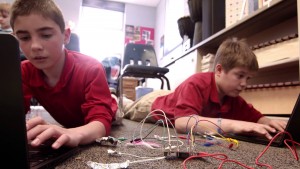
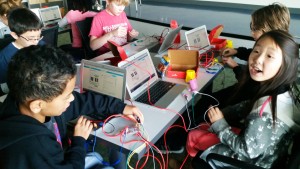
Using MaKey MaKey in the Classroom
The maker movement celebrates creativity, innovation, and entrepreneurship through the design and construction of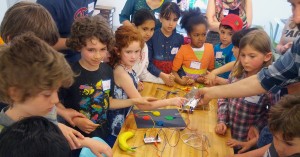 physical objects. Maker activities may come across as playful, even slightly wacky, explosions of inventiveness. But in education contexts like schools, museums, libraries, and after-school programs, research shows that if the invitation to creativity is accompanied by intentional structure and guidance, maker activities can be channeled to support deep student learning (Blikstein, 2013; Vossoughi, Escudé, Kong, & Hooper, 2013).
 For example in a tinkering class on circuitry, students begin exploring the basic concepts of circuits by connecting batteries, bulbs, motors, and buzzers using wires and clips. These “circuit blocks” become the foundations for finding out what works and what doesn’t. Adding switches and other inputs or outputs both allows students to develop a general understanding about how to wire a circuit and helps them understand that there are relationships between the types of circuits they build and the brightness of bulbs, speed of motors, or volume of buzzer tones.
With these foundational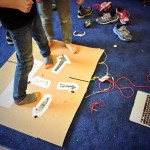 experiences behind them, students are ready to move on to a series of circuit-related activities that each draw on the initial experience, but add new complexities and often aesthetic opportunities for play, exploration, and personal expression.
(Source: http://www.ascd.org/publications/educational-leadership/dec14/vol72/num04/Tinkering-Is-Serious-Play.aspx)
Lesson Ideas Using MaKey MaKey
Year level: P-6
Students explore soundscapes with real objects in a musical water lesson that utilizes a key mapping software called Soundplant and MaKey MaKey.
 Year level 4-6
Simple Circuit: To complete a simple circuit, you must create a loop for the electrons to flow. So you need to get power from your power source to the LED and back to the power source. If you build a successful current, your light will shine! In this lab, you will create your own simple circuits with Makey Makey and once you’ve mastered that, you’ll move on to parallel circuits. Lastly, you’ll create your own DIY switch with Makey Makey!
Literacy comes alive with Candid MaKey Camera
 Year level 3-6
Combine Makey Makey with a webcam to create candid stories about your classroom. In this lesson you can also learn how students can write out short tableaux and create GIF cards for visualizing ideas in a text or even vocabulary reinforcement. Tableau’s also work for other contents. Social studies teachers can use this lesson for understanding historical events and science teachers could ask students to act out scientific ideas and concepts.
(Source: http://makeymakey.com/lessons/)

Why Should You Create With MaKey MaKey?
 We believe that everyone is creative, inventive, and imaginative. We believe that everyone can create the future and change the world. So we have dedicated our lives to making easy-to-use invention kits. We believe that the whole world is a construction kit, if we choose to see it that way. We want to help people start to think of themselves as Makers and agents of change. When you have the “Maker’s Mindset,” you know you can change the world.
(Source: http://www.makeymakey.com/)


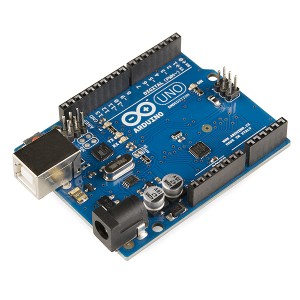 Arduino

 how to package a fragile item to ensure that it would remain safe and unbroken when being transported in the post.


