
 Using Plastimake in the Classroom
Subject
Design and Technology
Year Level
3/4 and 5/6
Strand
Design and Technologies Processes and Production Skills
Sub strand
Processing and Implementing
Select, and apply safe, procedures when using a variety of components and equipment to make solutions
Link to Resource
https://www.plastimake.com/
Cross Curriculum Priorities and General Capabilities
Numeracy, Information and Communication Technology (ICT) capacity, Critical and Creative Thinking, Personal and Social Capacity and Sustainability
Links to other Learning Areas
Science, The Arts
A classroom activity using this resource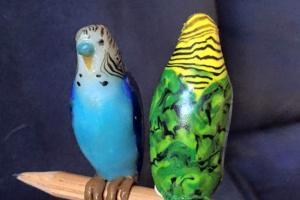
Plastimake is a great resource to have and use in a classroom. An example of the many activities you can do with the Plastimake is linking it to the Science Curriculum when teaching Biological Science. In Year 4, students will be learning about features and adaptations an animal has to help them survive in their environment (ACSSU043). Getting the students to actively create the features and adaptions of different animals is a great way to introduce the topic and spark student interest. For example when students are creating a bird, pose the question what  features do birds have? Why are those features important for their survival? Students will be following the procedure of how to use the Plastimake safely as well as creating something they have thought actively about. This hands on lesson is a great way for students of all levels to participate in as well as using the Technologies (Design and Technologies) Curriculum and the Science Curriculum together.
How to use this resource
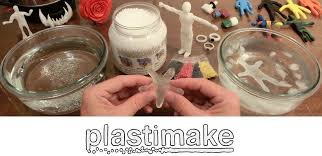
In order to use this resource in the classroom, you will simply need to order the Plastimake from the website (linked above) and have a bowl of hot and cold water. Plastimake is non-toxic, very strong and biodegradable so is safe for students to use right at their desks, no newspaper required! The only danger in in using Plastimake in the classroom is making sure students do not put their hands in the hot water and they wait for their Plastimake creation to cool before touching it (only takes a few seconds to cool).
When you get the Plastimake you will notice they start off as small white pellets. These small pellets, when put in the warm water, will become transparent. Once the pellets have stuck together, use a fork or other implement to take the Plastimake out of the water and let it cool for a few seconds. Once cool, students can then mould and create the Plastimake into the shape they want. Once students are happy with their creation, it gets placed into the cold water until it hardens. Once it hardens, students can paint their creation and have a well presented final product.
The great thing about Plastimake is how lightweight but highly durable it is. Another great thing about Plastimake is if you are unhappy with the creation, simply place it back into the warm water to reuse and then remould. Plastimake is quick and easy to use, reusable, strong, non-toxic, versatile and clean and is a great resource to use when teaching Design and Technologies.

